Showing posts with label Nail tutorials. Show all posts

Friday, 31 January 2014

Chinese New Year


Xin Nian Kuai Le!

Or in English,Happy New Year! 

After the Christmas recooperation period, perhaps this is a fresh start for everyone. Afterall, wasn't January about paying off Christmas bills and (trying to) shed off Christmas pounds? Now, this year according to the Chinese Zodiac- is the year of the horse. Horses are typically known to be: friendly, vain, vivascious, enduring, witty and impatient to name a few. Any horses (metaphorically speaking) care to confirm that... perhaps you might want to put down the mirror to comment. I'm actually an Ox and although I don't follow the zodiac animals to a T (but I do like the odd horoscope) I kinda agree with my traits: hardworking, loyal, reliable and impatient. 'Born leader' was also quoted. 

Anywho, today to celebrate the Chinese New Year, most of us are probably tucking in to a chow mein (so jealous, no offense Mum) whilst I am the 1% tucking in to a spag bol. Tonight, it's time to break the barrier of showing you a chinese recipe- who'd actually make it, you're all tucking into stir fried noodles right now! I thought lets do a nail art tutorial! Originally I was thinking of doing one for Valentines Day- but the Chinese are renowned for their long, acrylic, lotus nails so it would be more suitable to do a Chinese inspired one.

Yin Yang Nail Tutorial

You will need:
  • Black nail varnish
  • White nail varnish
  • Clear nail varnish
  • Black nail art pen (or a black eyeliner would work well)
  • Dotting tool
  • Nail varnish remover
Method:
  1. Firstly, cover your nails in clear nail varnish. Leave this to dry. 
  2. Secondly, paint your nails completely with white nail varnish- until the nail has gone opaque (you can't see through). Leave this to dry and get your black nail art pen or black eyeliner ready.
  3. Using your eyeliner/nail art pen, paint an almost 'S' shape (or backwards eclipse shape) in the middle of your white nail.
  4. Fill this shape in with black nail varnish; leave to dry. 
  5. Lastly, with your dotting tool (or I guess you could use a hair grip pulled into a straight line), paint a white dot in the top corner of the black section of the nail. Vice versa with the black dot onto the bottom corner of the white half. You can use a top coat hardener at this point when all nails are covered. (Optional).
  6. Clear up any mistakes with nail varnish and enjoy!
Yin Yang actually means the balance. Each of the colours means 'good' and 'bad'. They say that you can't have good without a little bit of bad, and you can't have bad without a little bit of good. Nothing is black and white.

Now, enjoy your new year and make it count.
xox


Name Your Link

Friday, 20 December 2013

Christmas Nailart is all I want for Xmas.

Ho ho ho! Santa and his elves are preparing his bulging,sack for that dreaded trek across the world. 
Whilst we're sat here busy bodying making sure our Christmas presents are here in time for Christmas. Ironic right? 
Gosh I haven't written in ages... I haven't even had time to shop for clothes, yet alone Xmas pressies recently. Bit ironic really for someone who has a 'fashion blog' and is known as a 'fashion blogger'. The fashion blogger who can't shop- interesting news headline. Ambiguous in a sense. Okay life story over, I thought as Halloween's crafts were late- I'd post up a nail art tutorial as my other Christmas ones are a bit outdated. You can check them out by clicking on the 'Nail tutorials' label at the side of my blog or by checking via my Facebook photo album. A Facebook link should be on the side here <<<

Tree-rific Nails!
These nails are so easy yet effective to do that you'll be jingling all the way in comparison to your elves.
None
You will need:
  • White/nude nail varnish
  • Dark green nail varnish
  • Green glitter nail varnish
  • A clear base and top nail polish (You can sometimes get polishes that are two in one, just use whatever works for you)
  • Sticky tape
  • Gold glitter star stickers- you can use whatever colour you like.
  • Nail dryer- optional
Method:
  1. Firstly, apply a clear base coat onto your nails. Allow these to dry naturally or you can use a nail dryer, then apply two coats of your nude or white coloured nail varnish. Leave to dry.
  2. Now the sticky part, place your sticky tape in a V shape across your nails- to make a triangle, as shown in the picture. 
  3. Keep the sticky tape in shape, now paint the triangle within the V dark green, using your dark green nail varnish- I'd advise painting for at least 2 coats. I say dark green as it gives a deeper colour for a base, but you can use whatever's lying around in your make-up bag. Leave this coat to dry then apply a glittery green nail varnish coat over the dark green base. Leave this to dry.
  4. This is when it gets fiddly, remove your sticky tape and get your gold glitter stickers ready. You then stick a star on top of your Christmas tree. Check the packet instructions as sometimes they need to be glued manually. 
  5. Instagram, tweet and show off your nails!

Products used/could be used in this tutorial:

Thursday, 31 October 2013

Happy Halloween 2013!

Hiya Stylistas!

Okay so I know that I have barely blogged the amount as I would want to blog these last few months; especially with Halloween. The few Halloween posts I have released have been popular. As I should be studying at the moment... I figured I could post some Halloween ideas for you this evening when you get all dressed up! Plus most of my readers are from abroad, so by the time they wake up they'll see my posts and to the crafts :) If not, well Halloween rarely lasts one day and no-one says no to yummy food!

Here are the links to this years tutorials (note there may be a delay on when the links are up):

Hell-raising Hair = http://arrayostyle.blogspot.co.uk/2013/10/halloween-crafts.html
Boo-tastic Decor = http://arrayostyle.blogspot.co.uk/2013/10/halloween-craft.html
Ghost Nails = http://arrayostyle.blogspot.co.uk/2013/10/halloween-nail-art.html
Pimped out Pumpkin = http://arrayostyle.blogspot.co.uk/2013/10/pimp-my-pumpkin.html

And if you create something Halloween ish do email it in to arrayostyle@hotmail.co.uk or tweet @ArrayOStyle or just tag us in your photo on Facebook :)

Monday, 26 August 2013

Nail Tutorials- Pink+Red=GlamPuss

Hi all Stylistas!

So if you've liked our Facebook page- you can see that it's been neglected recently (speaking of which, so had our Twitter which is the next project). Today, I started organising the photo albums so there's now a new album just for nail tutorials. Yayayaya! Yeah, I've put way too many hash tags on each photo. But, so what? Anyhow, if you didn't know September 1st is ArrayO'Style's second birthday. Which is amazing that it's still running- still juggling school and blog! Plus on our Facebook page each month we're letting you decide who will be our profile picture. It can be a celebrity, singer or a supermodel. Just head over to our Facebook page and you can start choosing now! (The Facebook link should be on the left of this article <<<).

Anyway, after organising the nail tutorial photos, it has come to my attention that the last tutorial I did was for the Fourth of July. Which was a while ago in blogger years. So today's tutorial is below :)

Pink + Red = Glamour Puss

You will need:


  • Pink Nail Varnish
  • Red Nail Varnish
  • Thin tape
  • Nail Varnish remover pens (for any mistakes, or you could dip a cotton bud in nail varnish)
  • Small gold studs
  • Optional Nail Dryer
  • Clear nail varnish- or a nail hardener on top

Method:

  1. Firstly, use the thin tape and establish the middle of your nails. Put the thin tape down the middle of the nail,  but make it so it's nearer to the right side of the nail. So the edge of the tape is along the middle, but most of the tape is on the right. This is so when you take the tape off there won't be a big gap in the middle.
  2. Secondly, apply the red nail varnish to the left half of your nail. If you wish you could use a nail dryer, or just manually wait 5 minutes to dry. Once the left half is dry, apply a second coat on top. Still keeping to the left side. You can use your nail varnish remover if there's any mistakes :)
  3. Thirdly, now you can remove the thin tape from your nail. This is where is starts to get fiddly, you need to paint the right hand side of your nail- using the pink nail varnish. Be careful as you don't want to accidentally go over onto the red side. If that does happen, apply another coat of the red nail polish or use your nail varnish remover onto the mishap. Next, apply a second coat of pink nail varnish on top.
  4. Once the pink side has dried, you may add a clear coat of nail varnish on top of the nail. Or a nail hardener if you prefer :)
  5. Time to get studding! Your nails should be painted. Check out your studs, sometimes they have a peel off sticky on the back, so you can just stick the stud onto the nail. If this is the case, position the stud at the top of the nail, in the centre. If it's not sticky, you need to get glue and stick it on carefully. Good luck!
Now, go and team your nails with a cute outfit like this:

Red + Pink =GlamPuss


Valentino short black dress
£3,205 - stylebop.com


Gold lip ring
newlook.com


Lauren Ralph Lauren buckle belt
£19 - bloomingdales.com


Wall art
£19 - urbanoutfitters.com


Other nail supplies which may come in handy:

Tuesday, 2 July 2013

4th of July Nail art!

2nd Four of July nail tutorial!

Hope you all enjoyed the first nail tutorial. I did promise another nail tutorial and it's in this post. Tomorrow I might do some food and craft tutorials to get into the USA spirit. Plus it gets those creative juices flowing. This tutorial is a bit more fiddly and you need longer nails for this one.

You will need:

  • Red nail varnish
  • Dark blue nail varnish
  • White nail varnish
  • Clear nail varnish
  • Thin tape
  • Nail varnish remover pens- for any mistakes
  • Optional nail dryer
Method:
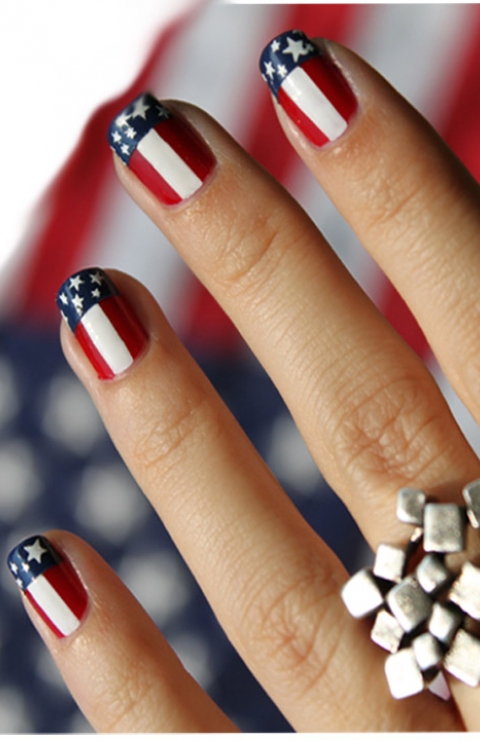
  1. Firstly, take your thin tape and put it on the line which separates the pink part of your nail from the white part of your nail. Paint below this line dark blue, like in the picture. Leave to dry or use a nail dryer.
  2. Now, using the thin tape divide the pink section of your nail into 3 even sections. Like in the picture. Place two strips down on your nail. Paint the middle section white and the two outer sections red. Leave to dry. I recommend giving at least two coats of varnish for a solid, brighter colour. 
  3. So now the top half of your nail will be done. Next is the stars. You can buy transfers although they're normally bigger than the space you've got. You need a steady hand, so grab your nail art brushes and dotting tools and do two triangles on top of eachother. It's hard to describe, but just paint a star as you would with paint. 
  4. Peel off your tape and leave to dry. Once dry apply a clear coat of varnish on top of the design.
Happy Independence Day Stylistas!


Other nail supplies which may come in handy:

4th of July!


Okay so it's now July! Yes summer has barely started but still someone's mentioned the C word... There's even a C-word song on a TV advert now. In JULY. If you haven't realised what word it is, it's the occasion marked in December. It's my last week of school!  6 weeks of fun in the 'sun', weather permitting. It is English weather we're talking about. Not gonna lie on Sunday and Monday BBQ sales soared, sunglasses adorned and the sun cream spread everywhere. Then today; rain coats at the ready. I feel like the rain is just doing a dance to decide whether to come down fully, it's there. It's not there again. Oh look it's reappeared. False alarm everyone. Whereas, in America they're already on summer break and have probably got amazing weather to go with it. Lucky...

But an American celebration is Independence day this 4th of July and let's all get into the red white and blue spirit of things with a nail tutorial. As it's the second, I've supplied 2 nail art tutorials for the occasion. The first one will be published the now and it's easier, the second will be posted later on. So let's begin!


So the tutorial is more inspiration based and you could probably work out how to do it anyway, but there's always the method here:

You will need:

  • White nail varnish
  • Red nail varnish
  • Blue nail varnish
  • A clear coat of nail varnish 
  • A dotting tool
Method:
  1. Firstly, apply your base white coat on top of your nails, you can apply two coats for a richer colour if you'd like to- but bear in mind there's going to be colour on top so it won't be in the spotlight as such. Leave to dry (you can use a nail dryer for this if you'd like).
  2. Now the fun bit! Take your dotting tool and red nail varnish. Dip the dotting tool into the red nail varnish and start dotting on each of your nails. Try to ensure there's an equal amount on each nail and don't go as overboard as you'd like to, because the blue still has to be applied. 
  3. Continue step two with the blue nail varnish and if necessary the white nail varnish.
  4. Leave to dry.
  5. Now you can apply a clear coat of nail varnish on top. If you're feeling very daring, some stick on gems would be cute in the middle of the dots.
Happy 4th of July Stylistas!

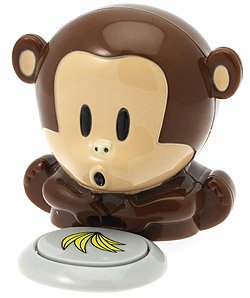
If you're looking for a nail dryer how cute is this one! You can purchase him at: 


Other nail supplies which may come in handy:

Saturday, 30 March 2013

Easter nail art!

Easter nail art!

Pastel polka-dots are perfect for the Spring time. As Easter means new life, why not give those crooked nails a new lease of life? You can do polka dots with any colours but as it's Easter I'm choosing pastels. Pastels have also been seen at the KCA's and various fashion shows at fashion week. Maybe mix it up with pastels and glitter varnish :) Whatever you feel like. I'm sure your nails will look hopping :)

For this tutorial you will need:

  • Nail varnish (obviously!)
  • Dotting tools or a bobby pin would work in the same way (if you pull it into halves)
  • Nail art brush
  • Clear nail varnish
  • Nail varnish remover (optional)
  • Cotton pads (optional but always handy for mistakes)
Method:
Models_own_easter_nail_art
  1. Starting with the polka dot nails- do these on the alternate nails (or you can change it up, I'm just showing as a guide). Using your dotting tool (or bobby pin/hair grip) you can start with 4/5 dots down the centre of the nail. Then place the dots vertically either side of this line. 
  2. Next for the nails left in the gaps, your nails will hatch :) Paint two squiggly horizontal lines (using the nail art brush which is like a mini paint brush for nails). If these go wrong always keep nail varnish remover and cotton pads next to you!
  3. Now, use the dotting tool to place a row of dots in between the two squiggly lines.
  4. Finally, apply a clear coat over the nails, or go for glitter to accentuate your eggs. Making the nails good enough to eat :)
Some bargain equipment you might want to check out:

Tuesday, 19 February 2013

Think pink!

So I saw these nails and instantly fell in love. I know a tad dramatic, but who wouldn't. Simple yet extremely glamorous. Here's the instructions and  the  equipment needed for the tutorial :)

You need:

  • Pale pink nail varnish
  • Gold glitter nail varnish
  • French manicure tip guides 
  • Tissue (for any mistakes)
  • Nail dryer (optional)
  • Cuticle pusher (optional)
  • Clear nail varnish
Method:
  1. Place the circular tip guides at the back of your nails. Make sure they are right up close to the skin. As you can see in the picture (the gold section) ^ Make sure the guide is firmly pressed down.
  2. Paint your nails pale pink, then allow drying time. You can use a nail dryer if you'd like to.
  3. Peel the tip guide off- you can use a cuticle pusher for this. 
  4. There should now be a semi circle shape with no colour near the back of your nails. Now you need steady hands. Paint the clear semi-circle gold, with the gold glitter nail varnish. You could always get someone to faintly hold the tip guide just above the gap whilst you paint it. Whichever way you want. Then allow drying time, you can use a nail dryer if you'd like to. 
  5. Paint your nails again, this time use the clear nail varnish. Allow drying time. Once dry, you can use the tissue (or if you have any other tools suitable, toothpicks work well) to clean up around the edges if you're a messy painter.
You're done! Time to go into glamour puss mode. 
Remember to email me pictures of your new nails at arrayostyle@hotmail.co.uk I always love to see what you create!

Here's some of the tools you need to purchase for this tutorial-


Sunday, 23 December 2012

Holidays Nail art!
Free time this weekend? Why don't you get those nails in check.
Candy Cane Nail Art Tutorial
Tips:

  • Make sure you leave enough space in between the green lines so you can fit the white line in.
  • Painting straight lines can be tricky, just take a deep breath and paint it in one quick sweep. Don't think twice about it.
  • If your glitter base is gritty and hard to paint on, do a layer of top coat before you start the stripes.
  • Saturday, 15 December 2012

    Christmas Nailart!

    Simply nailing, a wonderful set of nails!

    I was thinking of doing an advent calendar this year possibly with nail art tutorials? It's a bit late as it's the 15th, but let's add a tutorial anyway. In time for those Xmas office do's. Warning, if you have a wobbly hand this may not be for you- if you're up for the challenge use an incredibly thin brush for intricate details. Play around with the tutorial make it your own! If you want to use sparkles, g'wan it's Christmas! Snowflakes come in different shapes, you can experiment with other shapes :)
    Christmas Nail Art Tutorial
    Products used in this tutorial:


    Monday, 19 November 2012

    Watermelon nails!

    Nail Art Tutorial!
    Difficulty- Beginner
    Watermelon Nails Tutorial

    Tips

    • I made the seeds in an arc, but you can paint them randomly all over the nail if you want.
    • Don't worry about the light green squiggles being perfect...nature isn't perfect!
    • The white line makes it look more "finished", but if you're not confident in your ability to paint straight lines  just leave that step out.
    • You can reverse the manicure, with the green at your cuticle, for a different look.
    • You can always practice on a false nail :)